I would like to thank my wonderful son for helping with the editing and loading. Not sure how much more of these video tutorials I'm willing to do, because I have ZERO techno patience! This short 7 minute video took a good part of the afternoon to edit and upload. Living out in the sticks, plays hell with the internet speed. Despite that, it is fun to do, and works out other creative muscles.
Happy New Year!
Thursday, December 31, 2015
Monday, December 28, 2015
Lincoln re-visit. Toning down the contrast.

 "He has a face like a Hoosier Michel Angelo, so awful ugly it becomes beautiful, with it's strange mouth, it's deep cut, criss cross lines, and it's doughnut complexion." -Walt Whitman
Thursday, December 24, 2015
Spending time with Washington and the Lincolns

 Taking a break from sculpting to do some painting. Feeling a little rusty not having touched a brush since early October.
I would like to wish everyone a wonderful Christmas!
Taking a break from sculpting to do some painting. Feeling a little rusty not having touched a brush since early October.
I would like to wish everyone a wonderful Christmas!
Saturday, December 12, 2015


Friday, December 11, 2015
 Finally adding some clothes. The breeches for this period were still loose and baggy. The unique boot tops will be added later when the putty is cured. The putty is still soft when putting the rider back on the horse. Just a light dusting of talcum powder to help prevent any sticking. The soft putty will contour around the saddle and it's equipment thus making a tight and natural fit.
Wednesday, December 9, 2015


Sunday, December 6, 2015


Thursday, December 3, 2015

Saturday, November 28, 2015
Adding horse mane and horse furniture. When working wet on dry putty, I use saliva as a barrier. This helps prevent the fresh putty from sticking to the cured surface. To make flowing mane/hair, I will sculpt just small sections at time. Usually bottom to top of neck. I will flatten the section of fresh putty against the neck, working quick enough to keep it from sticking to the neck. Then it's all about manipulating the hair to desired look. It takes some timing, practice and patience.

 w
w


 w
w
Thursday, November 26, 2015


Sunday, November 22, 2015
Building the figure armatures
Taking a break from the horses to build the figure armatures. I use paper clips, they have strength but are pliable enough to take some manipulating.


Tuesday, November 17, 2015
Sculpting saddle holster covers
Adding these holster covers is good practice for sculpting drapery but being mindful of direction of the subject it's being attached to, this case a rearing horse.

Monday, November 16, 2015
Making saddle holsters
This is an item I really should have casted. They are fairly easy to do, but for as many as I make, it would be a time saver. It's basically plastic tubing with a blob of putty formed into a rough shape. I wrap wire around the tip to give the plastic rod some teeth for the putty to grab onto.


Saturday, November 14, 2015
Adding straps and saddles
Aside from the horses, I'll be utilizing other parts from these Arifix kits. The Scots Grey's kit has a neat saddle that makes a great foundation for the rider.


Wednesday, November 11, 2015
Cutting straps and drilling holes.
The straps for the saddle, bridle, etc are cut at various widths from thin plastic. The holes are being drilled for anchoring pins for the horse bit and to the legs for mounting to base.


Tuesday, November 10, 2015
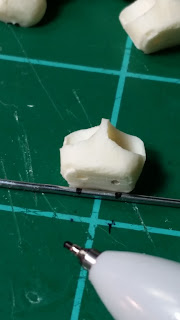
New putty and sculpting a horses neck
Nothing like a new batch of putty. I prefer Aves white epoxy putty. The natural color is too hard blend noticably. Using the white, it's much easier to see the making of a smooth transition. For smoothing, I use Mike Blank's recommdation of using saliva with a wide paint brush. Saliva has the right consistency while water will tend to break up the putty.


Monday, November 9, 2015
Fehrbellin Vignette -Composing Scene
The composing is pretty straight forward. Since it's a close copy of the illustration, there will be however, some minor tweaks here and there.


Sunday, November 8, 2015
Fehrbellin Vignette
I'm seperating two halves of the horses body to add more animation. The inside upper body, where the two halves meet, I will apply epoxy glue for added strength. I won't be filling the entire body cavity with putty but using just enough to fill the gap and spread over both sides.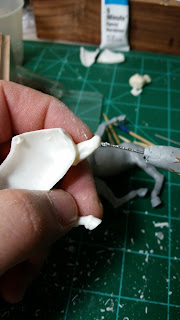


Saturday, November 7, 2015
Fehrbellin vignette -Cleaning castings
After cleaning up the flashing I will be cutting off limbs of one of the horses for reposition. Two of the three horses will get new necks.


Friday, November 6, 2015


Wednesday, November 4, 2015
...one more:)
These are just the pics I took with my smart phone, and I have to admit that these images are a tad better than the ones taken with my regular camera.

Tuesday, November 3, 2015


Subscribe to:
Comments (Atom)
WSS Black Powder Part 3
The Allies were really put on the back-foot in this battle. Their left flank took some deadly volleys and rolled poorly in the break test ph...

-
 Aside from my five year hiatus from blogging, I thought I'd start it up again with documenting some miniature wargaming. I am experiment...
