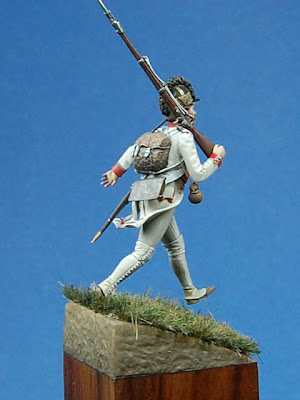
Here's the finished piece. I won't get into the color mixes for I didn't write any of them down...Which I really should do! Lets say I used pratically every light shade of grey from tan to greenish hues that Vallejo produces. I liked how it turned out and I won't be as intimidated to paint whites again.
A BIG thanks goes out to Gary Dombrowski for sharing his references. If it wasn't for his help I probably would have put this on the back-burner.
Thanks for following this project. I'm currently working on two figures, one a figure of Napoleon's "Indispensable Marshal", Berthier; the other a young Hindenburg from the Austro-Prussian War of 1866. This one loosely based on a photo of him at the time wearing his field kit.
Stay tuned.
Sunday, December 21, 2008
Wednesday, December 17, 2008
French Infantryman, 1790's- Part 4
Monday, December 15, 2008
French Infantryman, 1790's- Part 3
Saturday, December 13, 2008
French Infantryman, 1790's- Part 2
After the coat tails have cured, I started applying putty to the upper body. I don't normally sculpt the body before adding belts & straps. I prefer to "tuck" the putty, but this figure will have the illusion of movement and the straps/equipment should show this too by being raised from the body.
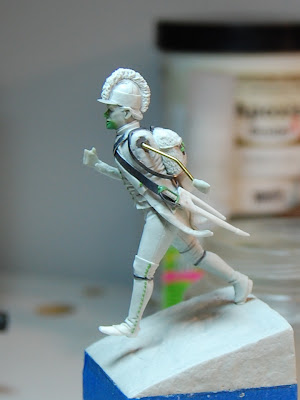
At this time I began work on the 'Tarleton' style helmet. The bill came from a cap in my spares box.
Once the upper body cured, I drew rough lines for the turn-backs. It may look too fragile and tedious for such pressure...and it is! But careful hands are needed to sculpt them. Some sculptors can fold back the thin putty into this shape but I find this too tedious for me and usually don't look right afterwards.
At this time I added hair, turban and comb foundation to the helmet.
Thanks for following this project.
Thursday, December 11, 2008
French Infantryman, 1790's- Part 1
My next project is a French infantryman from the 1790's. Inspiration came from a caption in Osprey's book on the same subject.
I will feature this project in an sbs format and try my best to explain the techniques I use.
I'm always on the lookout for a new pose. Some of my favorite sources are the "big" battle books. Sometimes there can be found neat vignette or single figure ideas within the large picture.
The past few figures of mine have been rather static so this one will be a change and a challenge.
I've added balsa strips to the base to give the "slope" some foundation for putty application.
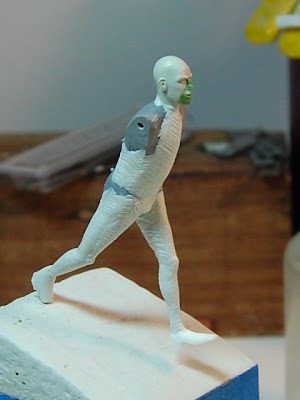
For the figure, I composed in my usual way. Carefully measuring the length of the legs and torso (I use the figure chart from Mike Blank's book). This is the most critical point for the sculptor and every effort should be used to make sure the proportions measure equally.
I start to flesh out my figures one leg at a time. After each application I score/etch the putty while 80% cured. If I have the time, I will place the figure under a lamp to speed up the curing process and go on to something else. I try to stay busy when waiting for things to dry. During this time I will be working on "building" or cleaning the figures accessories, weapons, gear, etc.
After the legs and trousers have been sculpted/cured, I moved next to the coat-tails. I used rolled out putty and then measure and cut to appropriate shape. Then these are carefully applied to the boddy with super glue and shaped. Since there will be alot of movement with this figure I decided to give the coat-tails some "flow". I set two ink pens under the tails and let cure overnight.
Thursday, December 4, 2008
Meet "Lucius"
"Lucius" became a member of the family back in 1996 when my wife and I lived in a small one bedroom apartment. He was saved from an early grave at the local dump by my wife, who worked in retail at the time. He had a large crack at the base of his neck nearly decapitating his head from the body. After a little TLC he became a rather nice uniform "hanger". When we moved into our next home and started a family, Lucius was packed away for want of room and of the fear the kids would be freaked out. Now that we have plenty of spare room in our present house, Lucius has come out of his cardboard coffin and has joined the family again, this time as guardian to the down stairs French doors.
It's a bit sad to know that Lucius looks better than most reenactors out there and is getting more use out of my uniform and gear than I will!
Subscribe to:
Posts (Atom)
French v. Brits & Allies Part: Dispositions 2
Starting from the Allied left. One independent cavalry unit from the Kings German Legion. A Brunswick infantry battalion with a Brunswick j...
-
Otto Dix (1891~1969) said of his paintings of World War One subjects "I did not want to cause fear and panic, but to let people know h...